Friday, January 2, 2015

Year of the Dolls!

I am no longer a CTMH consultant but I still like to find creative outlets.  This year I have decided to focus on my daughters and their dolls!

I want my girls to enjoy being children and not to rush into adulthood.  Playing with dolls is a great way to stay young.

My first craft was a doll chair.
It was definitely a learning experience for me.
I started with a Cosco sized cereal box.  After drawing out my design on one side I cut out that side and used the scrap as a template for the other side.
Next I covered it with duct tape.  I didn't worry about wrinkles because next I was covering with fabric.
Hot glueing fabric turned out to be harder than it looked.
I decided to skip the ruffle around the bottom.  Instead I added a belt.
To secure the fabric and help my chair to sit flat I added a piece of felt to the bottom.

It's a fun start to a new year! Now I just need a box big enough to make a couch to match.

Tuesday, September 10, 2013

A different kind of wreath

Our family motto is "We Are Laughing Together Every Ridiculous Second!"  It fits us and our goofy personalities, it is also an acronym for our last name.

I have been wanting to make a welcome sign for the front door with our motto on it, but I was having trouble with the how until I broke the glass in a picture frame.

Normally broken glass would mean I had to clean up and buy a new frame.  This time when I held up the now empty frame I was inspired.  I quickly dug through my scrapbooking supplies for a chip board banner I had been saving.   While digging I found some paper flowers and buttons from a past project.
It was amazing how hot glue and a few embellishments changed an empty frame into a wreath.  Using two different sizes of alphabet stamps I was able to make our name stand out but still fit our motto.

The stamps, ink, and chipboard banner were all from "Close to My Heart."  I am a consultant for the company and if you are inspired to recreate the project you can purchase those supplies on line from my business website.  http://caytw.ctmh.com/

Thursday, August 22, 2013

Girl's Birthday Card

My younger daughter is going to a birthday party so I decided this was the perfect excuse to play with my "Paper Doll" stamp from Close to My Heart (I am a consultant so the link is to me business page).
 
I started  by picking out my back ground.  Even though both papers are patterned the fact they only have one color on each makes them act as neutrals.
 The next step was stamping and coloring the girl.  I chose grey ink so even if it bled a little it would not smear on the image.   Then I filled in with water-color pencils and water.  I had to combine two colors for a good skin tone.
After finishing the doll  I used the same technique on an outfit.  The above image is before I added water.
To blend the colors I like to use just a damp paint brush, if you use to much water the lines start to blur.
I attached the doll to the front on the card using 3D dots, that way you could use the tabs when putting on the different outfits.
I added a ribbon along the side. To make the bow I first made a loop then pinched it in half.
I then wrapped  a second piece I ribbon around the center.  I used glue dots to hold it all together and attach it to the card.
The card turned out just like I had planned, which is actually unusual for me.
I also tucked in a few more stamped outfits that the recipient can color and cut out.

I always have fun using new products and techniques, when I am brave enough to try.  If you haven't tried water-colors yet I hope you will now.


Thursday, July 18, 2013

Close to my heart's new jewelry line

One great thing about being a CTMH consultant is the sneak peak at the up coming catalog.  Than means I have a chance to buy early and get people excited about what is coming!

It is easy to get excited about the Fall/Winter 2013 catalog.  To be honest when I flipped through the catalog I was a bit concerned.  One item that stood out to me was the new line of "do it yourself jewelry."

I was not eager to learn a new crafting skill and more than little worried about my skills.  But I decided to give it a try, besides it is hard to sell something you're afraid of.

The kit (which is how I chose to start) comes with everything you need, and only one small instruction sheet.
 For the most part the instruction were helpful and with a bit of experimenting I discovered it was fun.  My experience with paper crafting helped because I have made paper flowers just like the fabric ones on the necklace.  The only thing that was missing from the instructions was where to cluster the embelishments. 
In the end I was able to complete the project and be eager to try another.
And it gives me something cute and original to wear this weekend.

Wednesday, May 22, 2013

Improvising Washi Tape

I usually avoid trending my artwork.  It dates the pieces and makes them loose freshness.  It is also like adding an expiration date to a project, you will only display it while the trend is popular.  But I recently made an exception.

 Washi Tape, or patterned tape, has been showing up all over the place lately.  The tape adds color, patterns, and texture to projects.  It also adds an impromptu feel and makes the taped on element stand out because they appear to be added later.  While the product may be new in the scrapbook world the concept is not.  Most baby books and diaries have special places to tape in your memorabilia.  So rather than ignoring to tape trend I decided to embrace it.


The perfect place for trying out trends is a project that you want to date.  I picked an end of the school year journal.  The pages are 6x6 so there wasn't a lot of room to embellish and I wanted it to fold flat so the elements all had to be flat.  A bit of patterned tape fit the bill, it's flat and doesn't require much space.


I only had one problem, actually it was what I didn't have that was the problem.  I didn't have any tape. So I improvised.  I cut 1/2 inch strips of patterned paper and card-stock then cut those to the lengths I needed.  This worked better for me than using tape because I didn't have to worry about it folding up on itself.

In the end I was so happy with my project I decided to use my new "card-stock washi tape" technique on a card as well.


One of the keys to these projects was the paper, bright colors, smaller patters, and textures all helped pull it together.  This particular paper pack (Dream Pop) is only available until the end of May and can be purchased from any Close to my Heart consultant (including me.)  If you miss out on this opportunity don't worry, just look for glossy patterned card-stock  for a more tape like appearance.  And have fun mixing and matching.


Tuesday, June 26, 2012

Feeling Patriotic

The majority of my crafting comes right before a party.  I like to have something new to show the lovely ladies that keep me in business.  There are times when this is a stretch.  I will stare at my wall of craft supplies, my papers and my stamps, and then I will sigh.  There is nothing worse than crafting with out inspiration.  Sometimes I feel I need more inspiration than most.

This month I was dreading trying to make a card or something when it hit me.  I was suddenly inspired.  I snuck into my daughter's room and "borrowed" her American Girl doll.  If there is one thing I know about girls and dolls it is that they love parties.  The best thing about doll parties is that they can be small.

So I set to work making everything I could think of for a Forth of July parade day party.
 The first thing I did was make the USA banner.  The letters where stamped on patterned paper then cut out and mounted on accordion fold disks.

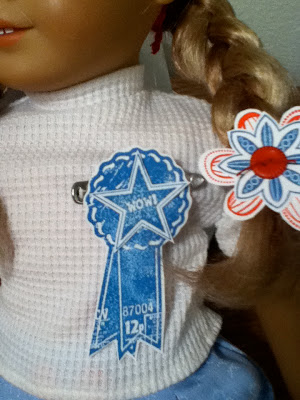
 Next I spruced up Heather (the doll).  The headband is yard with a stamped image and card stock glued to it.
 Her award (from winning tic-tac-toe) is another stamped image this one glued to a pin.
 Her braids are tied of with stamped flowers with button centers, the thread through the button is what holds them on.
 The tic-tac-toe game was really just an excuse for me to use my white marker, I loved it.

 A strip of patterned paper a strip of card stock and a stamped image to finish it off, simple combination that can make anything, even a twinkly, look classy.

 And now my favorite part, the table topper.  A simple set of wooden blocks.

 I may have made them a bit too busy, the background was stamped on all six side and the letters (in a darker ink) only on four.
The rocket I colored with markers after stamping.

So I learned a few things about stamping on wood.  First, it is fun.  I love finding new mediums to work with.  Second, it is easy.  No special supplies were needed.  Third, it can be messy, but not very.  My blocks are only for display.  No kids or adults will be handling or playing with them.  So I didn't worry about the ink being water based and running if it gets wet.  It took longer to set than paper when stamped so my fingers got a bit inky.  After a day of drying they are fine as long as no one puts them in their mouth.

All papers, inks and stamps used are from Close to My Heart (some maybe from retired products).  I am an independent consultant, if you are interested in the company or placing an order, you can visit my consultant's website http://caytw.ctmh.com/

Tuesday, March 27, 2012

Pretty Aunt Andy Wall Art

I'll be honest blogging about crafting is a bit intimidating to me.  Unlike homeschooling (which I spend hours planning and researching) when I craft it is very much off the cuff.  I like to start and finish a project all in one sitting.  Trying to explain what I did or why is often near impossible.  But when I have something that just works I love to share it so that is how I shall start, by sharing the things that just worked.

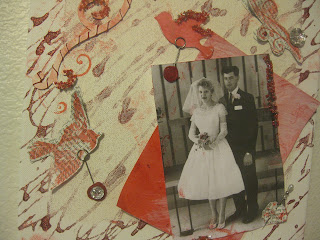
This one all started when I saw this picture of my Great Aunt Andy on her wedding day.  Something about the pose, the lighting, the expressions, I loved the photo.  And I wanted to create something.
The final product included a lot of little things I had wanted to try all put together.  The back ground was painted as well as drizzling glitter glue across it.
I added "bling where ever I could.  finding a place for a pin can be harder than you would think.
I stamped on printed pages, another technique I had been wanting to try.  When I cut out the bird and later extra flourishes I made sure to cut through multiple layers to add dimension.
My crumpled petals were simple to make but hard to glue down.  Usually I like nice clean lines and having an abstract flower was outside of my comfort zone.
Also out side of my comfort zone was using a glue gun.  Through out the project I attached tiny beads, from a broken necklace.  The easiest way to make them stick was putting the beads in an old pie pan, putting hot glue on the desired spot then pressing the hot glued object down onto the beads.  The one exception was the beads on the picture itself.  Those were an after thought so I had to pour the beads over my hot glue, not as easy.
I love the final product, it sits proudly in my front room.  And no worries the picture is only a copy, the original is safe so if I change color schemes I can make a new one.